The top picture shows the site on Day 1. Dick Shold has come in and dug out a hole about 3' longer in each dimension than the foundation footings. As the ground floor is a slab without a cellar, we only needed to go down about 14". The second and third images shows the footings in place which were poured on Day 3.The forms for the stem wall in image 4 went up on Days 4-6. Lots of 3/4" rebar in both footings and stem walls. The 4th image shows the stem wall being poured on Day 7. Nearly all could be poured using the chute from the truck. The rest was done using a wheelbarrow.
In the 5th image, the footings and stem wall is complete. Because all the earth was scraped off to the depth of the bottom of the footings, we need to backfill. The backfill needs to drain well, and provide a good base for the vapor barrier and foam, which come next. We elected to go with a lean mix of sand and cement, and needed 4 truckloads of 9 cubic yards each on Day 8! The wood forms block out an area below the ridge line in which we need to have a thicker slab.
On Day 9, the lean mix has firmed up enough overnight for the plumber and electrician to show up and dig utility ditches which go in under the slab. Placement is critical; the main conduit that goes up into a 2 x 4 hallway floor has to be with in an inch of plans.Once the pipes and conduits are in place, the lean mix will be shoveled in again and smoothed over to give a good base for the foam under-slab insulation and the slab.
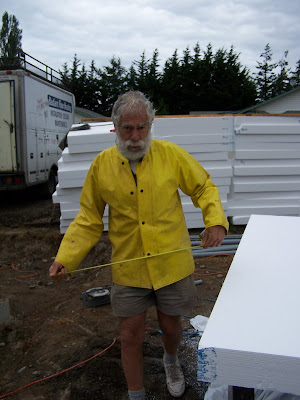
You're looking at $3k of expanded polystyrene foam which will give R40 under the slab. This is 5 times what code requires and is the first significant additional expense of a passive house over a conventional house.My builder Charles in the yellow slicker can't wait and is getting ready to put in the foam in the SW corner of the house where there are no utility ditches on Day 9. The vapor barrier goes under the foam and will go under the sill plate.
Follow the construction of Tom's super-insulated home in Port Townsend, WA
Thursday, August 26, 2010
Sunday, August 15, 2010
Before the big bang
It's hard to say when this project started. I've always wanted to build my own house and did a practice run on a log cabin 25 years ago. I did a lot of remodeling on the house in Seattle over 30 years, like the kitchen above. It has always bothered me that conventional houses use so much energy. I dreamed of passive solar, but the Seattle house was too leaky and poorly insulated for that.
A few years ago, I learned about the passive house from an article in the NY Times. The idea is to build a house for which the energy requirements are consistent with what we need to do in this era of global warming. See http://www.passivehouse.us/passiveHouse/PHIUSHome.html for a wealth of information. In a nutshell, build a small airtight super-insulated house with triple or quadruple pane windows that has south facing windows for solar gain and go easy on windows in other directions, especially North. Use an energy recovery ventilator to bring fresh air into the house while extracting 80% of the heat from the outgoing air and transferring it to the incoming air.
Is a passive house affordable? Home builders focus on the cost of construction, but more than 80% of the cost of a house over its usable lifetime is in operating it. A passive house is definitely affordable over 50-100 years, but I'll have to dig deeper into my wallet in the building phase. I'll try to keep track of construction costs in future postings and show where the passive house costs more. The house was designed in interaction with PT architects Richard Berg and Jesse Thomas. Jesse went to training sessions put on by the Passive House Institute and has become an skilled passive house designer.
OK, enough background and theory. Time to get real!
Subscribe to:
Comments (Atom)
.jpg)


